


|
|
Lift
off
While
we continue to search for an original Newgren lift pump, we made a strategic
decision to find an alternative so we could make the lift operational.
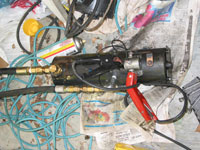
We have collected three different pump configurations. The first is
the HY-LO pump normally used with a snow plow. It has its own control
valve and reservoir. Since we wanted to use the control valve on the
Newgren, this wasn’t going to be our first choice, although it
is still a “possible” solution.
Pump number
two, a Jack-LO is basically the HY-LO pump. This one arrived with a
strange mounting bracket that won’t fit anywhere on the L-head.
This one also remains a good “possible” solution with the
addition of a fabricated mount.
The third
option came in the form of a 12 volt electric pump with attached reservoir,
but no control. While not true to the original design, later model Newgren
lifts either came with or were retrofitted with electric pumps and controls.
This option appeared to be the most straight-forward approach.
Plumb
tickled
The
first order of business was to plumb the lift to make sure it would
work with the pump. Since the pump placement is going to be different
for our three choices, we are starting with off-the-shelf parts from
the local hardware and farm supply stores. This simple act resulted
in no less than four hardware store runs and two farm store runs spread
over two weekends. The hardware store is 20 minutes away and the farm
store is 45 minutes away. The resulting “temporary” configuration
is a jumble of “parts.”
We had mounted
the lift (see part 10) temporarily and hadn’t been able to get
it in the correct position. So Barry decided to remove the lift, lowering
it enough to allow for easy access to the control valve and various
hoses. It took Barry about an hour to slowly lower the lift.
Start'er
up
The
next task was to remove the old hardware from the pump and ensure it
was in working order. The old hardware came off without a problem. Next
was a quick electrical test. The motor is marked 12v and has a solenoid
for on/off control. Barry attached jumper cables to the terminals and
shorted the solenoid top control terminal to the positive cable. Nothing.
He then shorted the positive terminal to the motor terminal and it sprung
to life! Good news. Replace the solenoid and we should be set.
Luckily the
chief mechanics were available to review the project. Barry’s
dad suggested that the solenoid might be switched on the ground side.
A quick test and it worked perfectly! Saved once again from replacing
a perfectly good part.
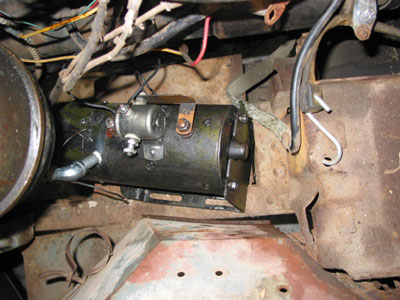
5-4-3-2-1
Barry added a toggle switch across the solenoid and the ground terminal.
When mounted in the jeep, we will place the switch on the dash and only
use the pump when needed. After attaching the hoses, and filling both
reservoirs as best he could, he throw the switch. LIFT OFF.
Well, actually,
the cylinder did extend without anyone moving the control valve. It
must have been stuck in the open position. Barry quickly turned off
the pump and was able to move the valve to the “down” position
and retract the cylinder by hand. He flipped the switch again and nothing
happened. Perfect! He moved the control valve and the cylinder extended.
Moved it to the down position and, applying a little weight, the cylinder
arms went down. After the fourth or fifth cycle, the cylinder seemed
to slow. More testing needed, but the weekend had ended.
Like a glove
Not
having the Willys available for rides and work was enough of a motivator
for Barry to get the lift back on. He was able to use a combination
of jacks and wood blocks to get the lift in place. He had installed
an elbow on a hose that he thought was preventing the lift from lining
up correctly. It quickly became clear that the hose was fine and something
else was preventing the rear of the lift from moving into the proper
position. What the eye couldn’t see, the hand could feel. A muffler
hanger bracket was still attached to the middle of the frame. The perfectly
matching rust of the frame and bracket made it almost invisible.
A couple of busted bolts later, the lift slipped into place. There was
still the matter of the bent bumper and a pry bar between the side rail
and lift was required to get a bolt inserted. Tightening the bolt drew
the passenger side into perfect alignment.
Weighing
in
While
on jacks, the lift had appeared to operate normally. With the lift attached
to the frame, we were ready to do a real test. With Barry (weight not
revealed, but plenty for testing purposes) standing on the short arms,
Paula worked the rear controls. Barry had a quick trip up – a
great feeling. However, if the control was returned to the neutral position,
the lift dropped. Fluid appears to be leaking past the control valve.
Bummer. It looks like a rebuild of the control valve will be needed.
That means dropping the lift again. For now, on the advice of the chief
mechanics, we will continue to operate the lift and see if the seals
might swell enough to “heal” the leaking problem.
Like
a glove – part II
Ron Ingram’s CJ3B has the reservoir mounted in front of the battery
(http://www.film.queensu.ca/CJ3B/Photos/Farm/IngramEngine.jpg).
It appeared there is plenty of room for our pump there too. A quick
measurement verifies that the pump should fit nicely. All that is required
is to remove the starter switch and voltage regulator from the fender,
along with removing the battery. The pump is heavy, about 30 pounds
and will need to be securely fastened. The generator splash shield,
while not supported on the engine side, makes a nice shelf. There also
appeared to be a tie-in point near the motor mount; a pre-existing hole
in the splash shield right at the motor mount aligns perfectly with
the pump base. For now, that single bolt seems enough to prevent any
movement. When we replace the body we will fabricate a more secure mount
bracket.
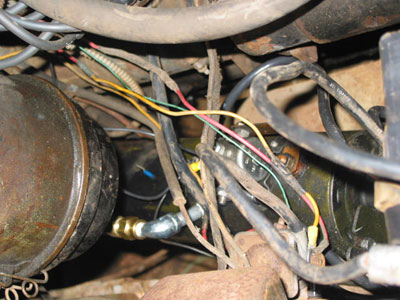
The location made wiring a breeze. Short starter cables were run to
the chassis ground bolt and to the hot side of the starter switch. The
on/off switch was mounted in one of the radio knob holes for now. A
quick test and everything is working great! We had considered adding
a light to indicate the lift pump was running (to prevent running down
the battery). The pump is actually quite loud, even audible when the
engine is running, so that won’t be necessary.
Next up, making the implement arms and installing the driver compartment
controls.
Barry's notes:
Evan's notes:
|
|

